
Foreword:
I feel like every modern mazda forum has one of these threads by some madlad who decides to go in reverse from 'fancier' oem headlights to a basic downgrade to halogen housing/wiring. If youre asking yourself why would anyone do this, the answer is simple, we dont want to be robbed by mazda. The 'oem LED' headlights which is the trend for ALL newer cars now for every manufacturer have one crutch that people dont notice until its too late; you cannot replace the bulbs. This means when a light dies out and it WILL EVENTUALLY you have to buy a brand new one from mazda which sells for about a grand.. Buying the oem led lights used is never a good idea because scalpers will sell you them for 400-600 a side and it could die tomorrow leaving you to buy a whole new set all over again. This project was started out of necessity and quite frankly being a cheap *** diy-er who doesnt want to keep spending thousands on oem headlights. Just like the right to repair, it should be our choice not a forced decision that a manufacturer makes 'on our behalf' to sell more units for profit.
SO with that being said lets get down to the nitty gritty.
Thankfully our mazdas started off with a basic halogen variant headlight housing so thankfully that makes it easier since we dont need to seek aftermarket alternatives and with many newer cars you are out of luck entirely. (looking at you specifically hyundai with the weird decepticon bug eye leds in the newer models grilles).
Jumping back to a previous PSA post here
I posted 2 pictures of the connectors I discovered when I foolishly used to believe it was going to be a simple swap out whenever my led died.
The LED units come with a 14 pin connector and a bunch of more wiring for other stuff specifically the drls and other sensors and the 'auto leveling' features etc.
The halogen units come with a simple 2 wire plug and REPLACABLE BULB for the corner light, low beam and hi beam.
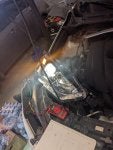
After taking the bumper off slightly due to my rally light bar blocking my reach I started poking around to remove the passenger headlight harness.
![Image]()
The picture above is the 'back view' of the headlight connector that runs up to the housing itself. You need to use a pair of needle nose pliers to pinch that bottom tab on the back while you pull the other end from the front. It is incredibly difficult to do with your fingers since you probably never removed there lights before and theyre borderline frozen in place.
Once that was off I poked around with a volt meter when lights where on during drl/lo/hi etc and this lovely quick diagram is what I ended up with: NOTE this diagram is from looking at the actual plug from the front, not like how wiring diagrams show you the form behind, this is actually what you would see when you look at it and the pins in front of you with the wire loom in the back side.
![Image]()
For most people the picture above is all you will need really. I used the top right of the oem harness (that goes to the car not to the oem led housing) as a ground and ran tests for all 3 stages of the lighting process.
The top half is the connections on my replacement tyc halogen housing lights. It might not be the same as the oem halogens but as long as you can identify which is the power and ground for the corner/low/and hi beam lights you should be all set.
FOR THE CORNER/PARKING LIGHTS
POWER:Use the 3rd/bottom row , 2nd column connector to get power for the corners. These could be for drls or whatever but it was the only terminal that fed 12v while the rest were either 0 or 0.5
GROUND: top right pin
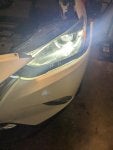
RESULT: The corner light turns on when you toggle the first stage of the light controls on the steering wheel stem. Pic rel for halogen vs led
![Image]()
![Image]()
Excuse the dirty led housing since Its still covered in snow/road grime.
FOR THE LOW BEAMS see bottom left of diagram
POWER: use the pin on the 2nd row, 1st column. In the diagram it shows the corner terminal is still reading volts also which is intended functionality
GROUND: top right yet again
RESULT: Corner lights should be on as well as the low beam on the halogen. Matches functionality on the led.
![Image]()
![Image]()
cont. next post due to image uploading issues
I feel like every modern mazda forum has one of these threads by some madlad who decides to go in reverse from 'fancier' oem headlights to a basic downgrade to halogen housing/wiring. If youre asking yourself why would anyone do this, the answer is simple, we dont want to be robbed by mazda. The 'oem LED' headlights which is the trend for ALL newer cars now for every manufacturer have one crutch that people dont notice until its too late; you cannot replace the bulbs. This means when a light dies out and it WILL EVENTUALLY you have to buy a brand new one from mazda which sells for about a grand.. Buying the oem led lights used is never a good idea because scalpers will sell you them for 400-600 a side and it could die tomorrow leaving you to buy a whole new set all over again. This project was started out of necessity and quite frankly being a cheap *** diy-er who doesnt want to keep spending thousands on oem headlights. Just like the right to repair, it should be our choice not a forced decision that a manufacturer makes 'on our behalf' to sell more units for profit.
SO with that being said lets get down to the nitty gritty.
Thankfully our mazdas started off with a basic halogen variant headlight housing so thankfully that makes it easier since we dont need to seek aftermarket alternatives and with many newer cars you are out of luck entirely. (looking at you specifically hyundai with the weird decepticon bug eye leds in the newer models grilles).
Jumping back to a previous PSA post here
I posted 2 pictures of the connectors I discovered when I foolishly used to believe it was going to be a simple swap out whenever my led died.
The LED units come with a 14 pin connector and a bunch of more wiring for other stuff specifically the drls and other sensors and the 'auto leveling' features etc.
The halogen units come with a simple 2 wire plug and REPLACABLE BULB for the corner light, low beam and hi beam.
After taking the bumper off slightly due to my rally light bar blocking my reach I started poking around to remove the passenger headlight harness.
The picture above is the 'back view' of the headlight connector that runs up to the housing itself. You need to use a pair of needle nose pliers to pinch that bottom tab on the back while you pull the other end from the front. It is incredibly difficult to do with your fingers since you probably never removed there lights before and theyre borderline frozen in place.
Once that was off I poked around with a volt meter when lights where on during drl/lo/hi etc and this lovely quick diagram is what I ended up with: NOTE this diagram is from looking at the actual plug from the front, not like how wiring diagrams show you the form behind, this is actually what you would see when you look at it and the pins in front of you with the wire loom in the back side.
For most people the picture above is all you will need really. I used the top right of the oem harness (that goes to the car not to the oem led housing) as a ground and ran tests for all 3 stages of the lighting process.
The top half is the connections on my replacement tyc halogen housing lights. It might not be the same as the oem halogens but as long as you can identify which is the power and ground for the corner/low/and hi beam lights you should be all set.
FOR THE CORNER/PARKING LIGHTS
POWER:Use the 3rd/bottom row , 2nd column connector to get power for the corners. These could be for drls or whatever but it was the only terminal that fed 12v while the rest were either 0 or 0.5
GROUND: top right pin
RESULT: The corner light turns on when you toggle the first stage of the light controls on the steering wheel stem. Pic rel for halogen vs led
Excuse the dirty led housing since Its still covered in snow/road grime.
FOR THE LOW BEAMS see bottom left of diagram
POWER: use the pin on the 2nd row, 1st column. In the diagram it shows the corner terminal is still reading volts also which is intended functionality
GROUND: top right yet again
RESULT: Corner lights should be on as well as the low beam on the halogen. Matches functionality on the led.
cont. next post due to image uploading issues